Trimitsis Woodworking Weblog
  • About
  • Contact
  • Travels with Musti

On the flow properties of roof snow

Posted on 4 January 2014

snow slowly sliding off a roof


roof snow slowly sliding off roof


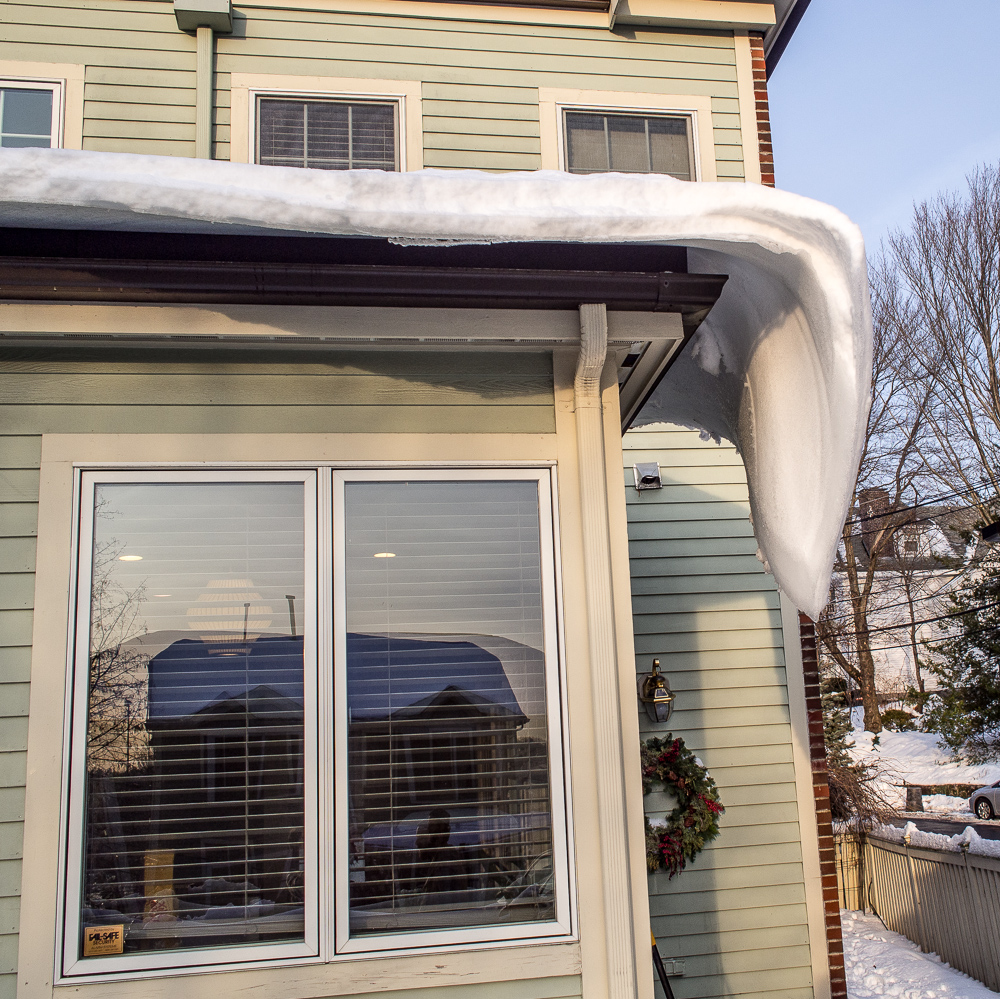
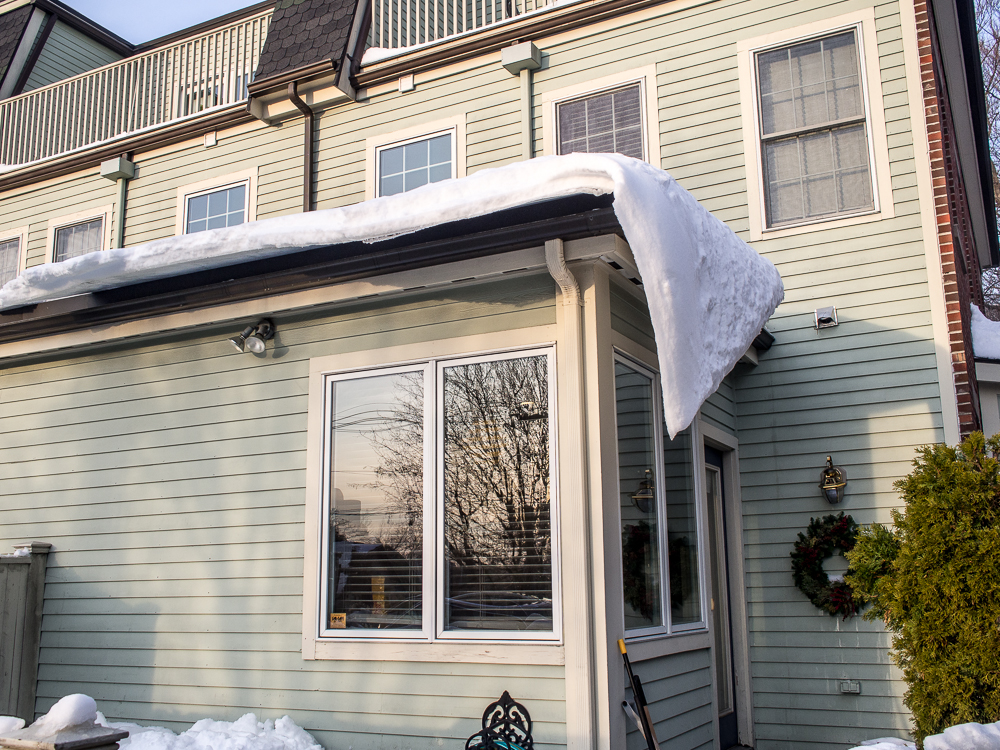
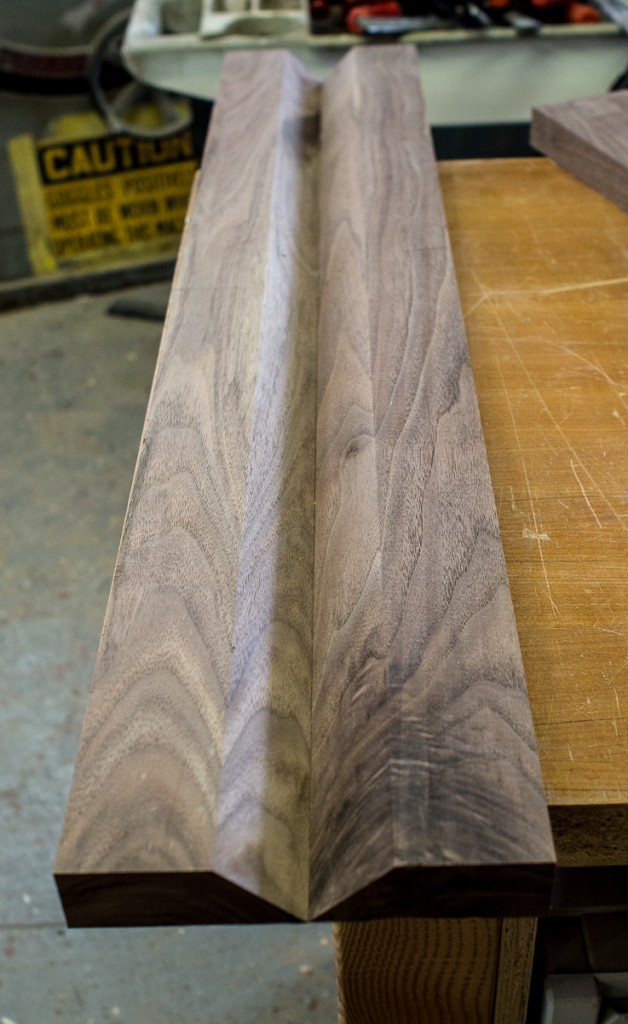
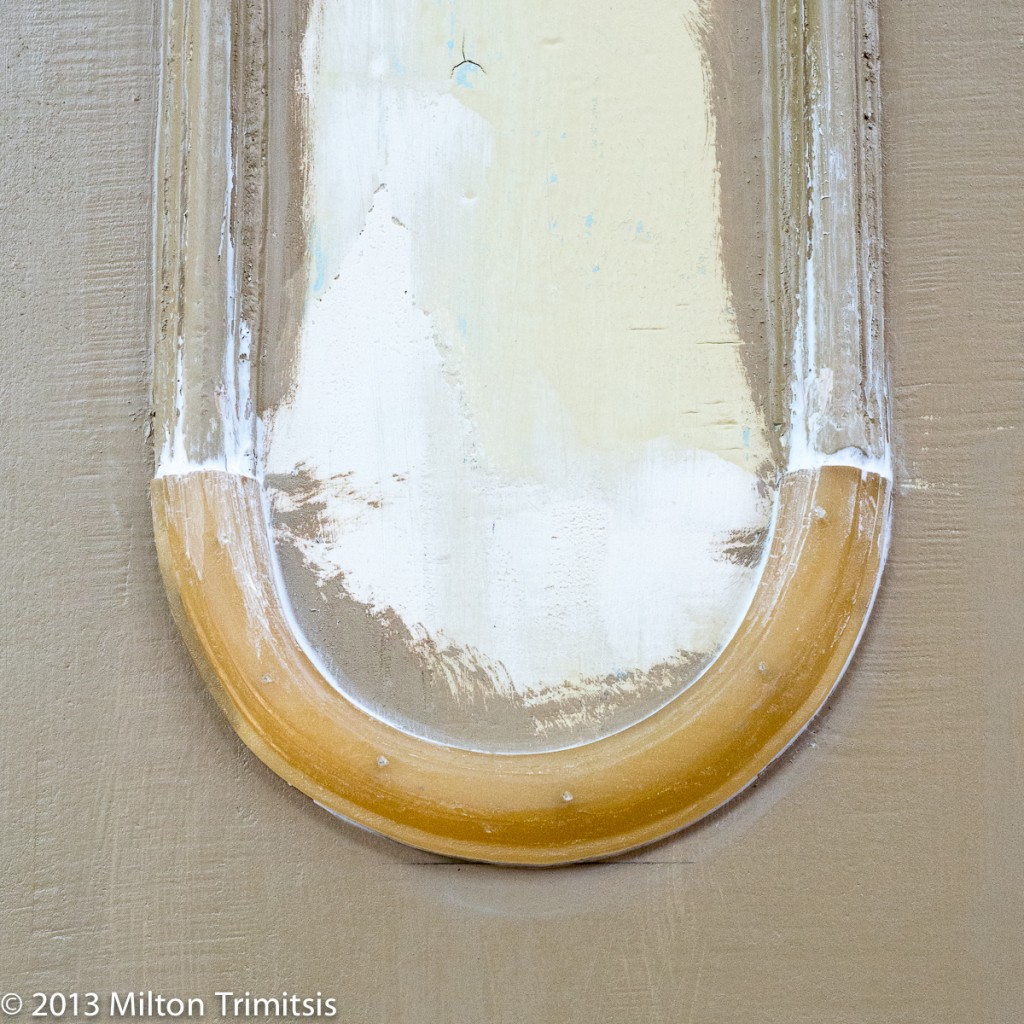
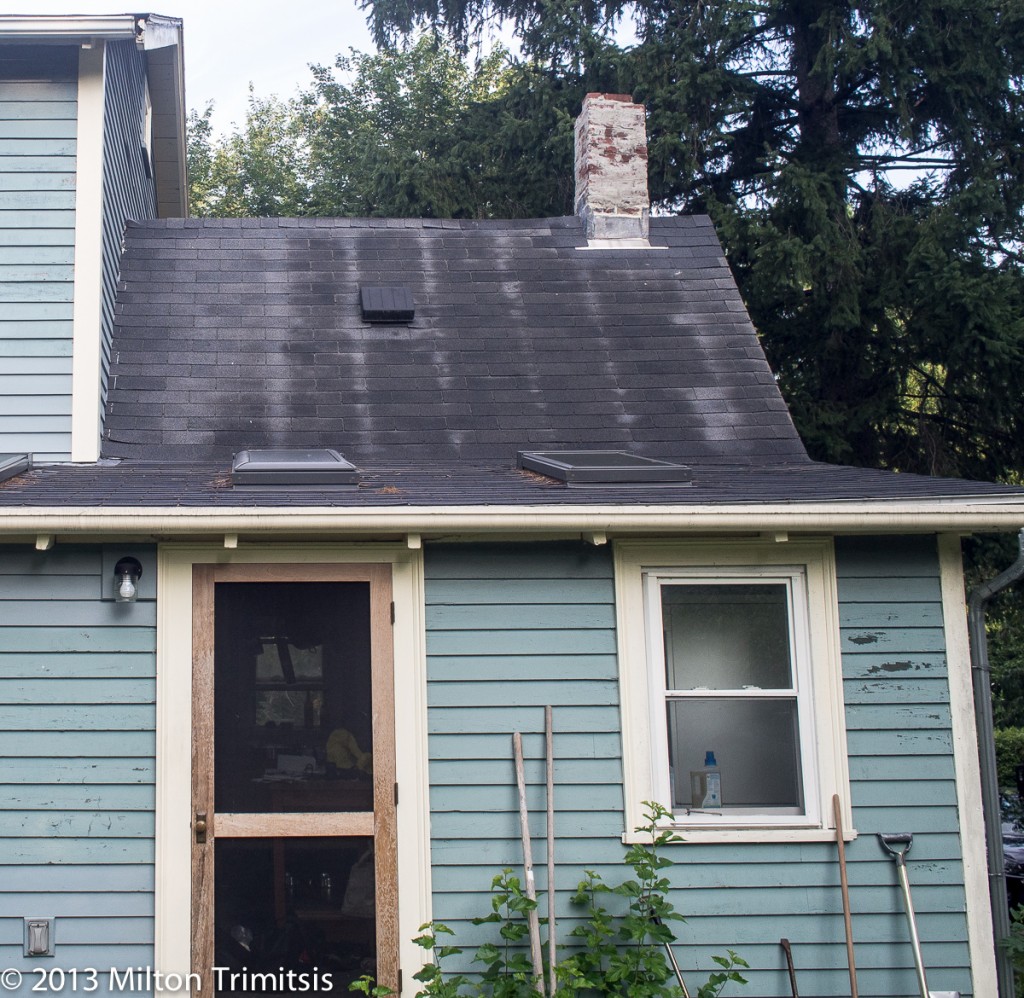
When we arrived at our job site last week, we found this roof snow impersonating a sheet of over-warm plastic.  The temperature was a touch above freezing, and the overhang didn’t last very long.

Categories: Seen

Tagged: flow, plastic deformation, roof snow

0 Comments

Luc in box truck

Posted on 23 October 2013

Border collie in driver's seat of Isuzu box truck
Categories: Seen

Tagged: box truck, Luc

0 Comments

Fireplace makeover

Posted on 12 October 2013

Stone hearth and tiled mantel for wood-burning stove


wood mantel, gas fireplace, tiled surround, and built-in bookcase


Our client, an architect specializing in masonry building conservation, knew she didn’t want to preserve the brown tiled mantle that previous owners had built.  The mantel and hearth were designed for a wood-burning stove that she and her husband never used, and the mantel had a jarring presence in their living room.  She designed (and we built) the new mantel and flanking bookcase to have a cleaner, more classic appearance that fit in better with other details in the house.  The crown molding we added also helps tie the new work in with the rest of the room.  And the gas fireplace provides warmth and convenience that the earlier hole in the wall couldn’t muster.


The fireplace is made by Regency and installed by Black Magic Chimney and Fireplace.  We found reclaimed pumpkin pine at Longleaf Lumber that matched the existing floor amazingly well, allowing us to patch in where the old hearth had been.  Pumpkin pine is a name given to certain deeply-colored examples of old-growth eastern white pine.

Categories: Before and after

Tagged: bookcase, built-in cabinets, fireplace, gas fireplace, Longleaf Lumber, mantel, pumpkin pine, tile, tile surround

2 Comments

Making it

Posted on 5 October 2013

After my obsessions in the previous posting about the shapes of back band molding profiles, it was nice to get the opportunity to return to the physical realm and run some molding.

Many pieces of newly-fabricated back band modling

The wood species is poplar, our standard choice for paint-grade millwork.


We ran the profile on one of our SCMi shapers.

SCMi T 110i tilting-head shaper

This refrigerator-sized beast is essentially a stationary version of a hand-held router, but as when moving from a pedal bike to a large motorcycle, there are some qualitative operational differences.


The cutting head holds a pair of custom-fabricated knives to match the molding profile we want to reproduce.

Back band molding knives in a corrugated molding head on an SCMi shaper


Connecticut Saw and Tool fabricates the knives for us from a drawing of the original molding.

Line drawing of bed molding profile


Categories: Shop work

Tagged: bed molding, Connecticut Saw and Tool, molding profile, poplar, SCMi, shaper, shop work

0 Comments

Minutia

Posted on 13 September 2013

Comparison of two similar back band moldings


We had saved as much of the original door and window casing as we could before starting demolition.  Now that we were creeping toward the final stages of the project, we had to figure out if we had enough salvaged material, or if we would need to make shaper knives to replicate some of it.  Greg did the inventory, and it looked like we had enough casing, but we would be short of band molding.  I asked him to bring me a sample of the band so I could get the knives made, but the piece he brought me (above on the right) didn’t look quite right.  It was made of poplar, which would have been a very unusual species for mid-19th-century trim, and the poplar looked kind of new.  But more than that, the molding was ugly.


I asked Greg to check if there was more than one version of trim floating around, and sure enough, he brought me another example (above left).  This one looked like pine, and it seemed older, both from the oxidation of the wood and the tight grain structure.  And it was graceful.


I realize that I may be on thin ice claiming that one molding profile is inherently more pleasing than another, but — relativists and political correctness be damned! — I feel strongly about this one.  Not sure I’m ready to make my stand across all times and all cultures, but for those of us who’ve grown up immersed in the Greco-Roman architectural tradition, i.e., most everyone in North America and Europe, absolute judgements are sometimes warranted.  Some things are objectively more beautiful than others, some curves have lift and spring, and others fall flat.  I’m working hard at explicitly understanding the factors that make for grace, but for now, with apologies to Justice Stewart, I’ll just claim that I know it when I see it.


The questions remains though:  why the ugly molding mixed in with the good stuff?  I suspect it was installed during an earlier renovation to repair damage from a significant fire, and, to their credit,  the carpenters made an effort to match the original profiles, but they didn’t quite nail it.


Perhaps no one else will notice the difference, but I like to think that staying open to seeing a beautiful curve cultivates a habit of mind that helps us execute the details that people do notice.  So when a prospective client asks me why she should choose my company over the one that bid 30% less, I point to the two moldings.  If they get it and choose me, great; if they don’t and choose the other guy, that probably works out alright as well.

Categories: Details

Tagged: back band, beauty, Molding, original

0 Comments

Moving in

Posted on 3 September 2013

It’s always gratifying to know that our clients are getting use out of the things we build them.  In this case, Esther the cat took up residence on the mantel within five minutes of our finishing the installation.

Cat sitting on newly-installed fireplace mantel
Categories: Seen, Shop work

Tagged: bookcase, cat, fireplace, mantel

0 Comments

How to turn 6-foot boards into a 7-foot table

Posted on 3 September 2013

We had finished the carpentry for the kitchen, and the only thing missing was the table.  The clients and architect had long planned a large, counter-height table to complete the kitchen, but a suitable table was not presenting itself.  The unusual dimensions almost certainly precluded finding a pre-built table, and no custom design had gelled yet.  The call from Paris (Texas) broke the logjam.  It turned out that our client’s grandfather, a woodworker, was close to retirement, and he was clearing out his shop.  He had a pile of walnut that he’d had cut almost 50 years before and never gotten around to using.  Would his grandson be interested in it?  He was, and worked to convince me that I should be too.  Several times in the past I’ve gotten very excited upon learning of stashes of old hardwood lumber, but the troves always turned out to be firewood or compost, rather than glorious wide boards.  With some trepidation, I agreed to have the walnut shipped to our shop from Texas.


The walnut we received was neither treasure nor junk.  Some of the wood had gorgeous color and grain patterns, but it was soon apparent that the project would not be straightforward.  The first issue was that the clients wanted a 7-foot-long table, but we had received a pile of 6-foot boards.   Carol Marsh, the architect from Helios Design Group, came up with an elegant design for the top that solved the length problem for that part of the table.

walnut boards arranged to form a tabletop


tongue-and-groove joinery for walnut tabletop


The second problem was quantity.  There seemed to be two different species of walnut represented in the stack, perhaps eastern black and claro; neither alone would be enough for the planned table, and they looked so different we didn’t want to combine them in one piece of furniture.

Claro walnut compared to eastern black walnut

In the photo above, the top board is what I’m calling claro wanut, and the bottom one is (I think) eastern black walnut.  We had more of the eastern black walnut, so that’s what went into the table.


Since the 50-year-old walnut was so distinctive, we didn’t think we could find commercially-available or locally-cut material that would be a good match.  The client also was very concerned with maintaining the integrity of the wood as a way to honor his uncle.  So we set out to be tricky.


The aprons for the long sides of the table were the first challenge we tackled.  These needed to be nearly 7 feet long, but they also played a critical structural role to keep the long tabletop from sagging.  We didn’t feel that we could join them mid-span as we’d done with the boards making up the top.  Instead, we started with a long poplar core and glued walnut to the edges and ends.  To get the long walnut face for the width of the apron, we cut thick walnut veneers and book-matched them end to end.

poplar and walnut table aprons being glued up Walnut veneers being glued to poplar cores

We had wanted to prioritize the tabletop and the aprons, as they would be most visually prominent, but we were getting seriously short of material by the time were making the legs.  We did what we seem best at — making something simple very, very complicated.  Each of the straight, square legs was glued up from 7 separate pieces of wood.  First, poplar blanks with walnut ends:

poplar and walnut pieces for table legs


Then gluing a walnut veneer for one inside face:


walnut and poplar table legs in clamps


And a second veneer:

walnut and poplar table legs in clamps Walnut and poplar table leg


And finally a thicker mitered cap for the two outward-facing sides:

mitered walnut veneer for table leg


Hopefully, none of the effort is visible in the finished table:

Modernist walnut table with border collie


Walnut kitchen table end view


Detailed view of modernist walnut kitchen table
Categories: Found, Shop work

Tagged: Helios Design Group, Paris, table, Texas, veneer, walnut

0 Comments

Cheating?

Posted on 26 August 2013

Regular readers of this weblog will have gathered that we don’t usually shirk difficult tasks; some might suggest that we tend instead to the masochistic.   I’m not incapable, though, of considering where our efforts might best be expended.


We’ve been working on an exterior restoration project on an early Victorian house in the Ashmont Hill section of Dorchester.  One of the last remaining tasks was to reproduce two small curved molding elements that recurred many times around the house.  Something like half of the existing pieces, about 8 of each profile, were too crumbly or rotten for the painters to work with.  We removed an intact sample of each and considered our options.

samples of two curved wooden exterior moldings

The original parts had been sawn out of solid wood before they were profiled, a relatively efficient way to make curved blanks.  However, this leaves the parts inherently weak, as the wood grain does not follow the curve of the molding, and in fact, many of the existing pieces had failed where the wood grain was perpendicular to the curve.  The other, more time-consuming (read masochistic) way to make the blanks is to glue them up from thin bendable strips of wood that follow the curve.  This method yields strong, durable parts, but the work might have taken us a week or more.


For some time, I’ve been interested in exploring the possibility of making a mold of small parts like these and then casting as many duplicates as we needed. Until now I had never put in the time to figure out how to actually do it, but this project pushed me over the edge.  After several sessions of unilluminating online research, I found a company called Reynolds Advanced Materials that seemed to specialize in selling exactly the sorts of materials I was looking for, and, joy(!), they had a location in Boston.  Their staff were exceedingly helpful in sorting out which of the many possible mold-making and casting materials were best for this application, and I left with heavy boxes and uncommon optimism.


Hobbs, one of my newest colleagues, agreed to be the guinea pig with the unfamiliar materials.  He made a silicone mold of the original parts on one day, and cast all of the reproductions the next.

Pouring urethane resin into a silicone mold


Pouring urethane resin into a silicone mold, closeup


The 30-minute cure time of the urethane resin made the casting work go quickly and smoothly.

Removing urethan resin casting from silicone mold


completed urethane casting of curved molding on top of silicone mold


A day later, the reproductions had been installed on the house, awaiting paint.

mansard window with plastic part completing band molding


Molded plastic part completing band molding on mansard window reproduction urethane molding installed on corner board


We chose to use a semi-rigid urethane for the cast parts so that we could nail them in place without danger of their shattering.  An unanticipated benefit is that finish nails shot into the molding with a pneumatic gun disappear below the surface, and the plastic seems to seal behind them.


Here’s an instance where the original and the reproduction are adjacent:

Reproduction urethane molding adjacent to original wood molding


The total cost for the molding-and-casting approach ended up at less than 25% of the projected cost of making the parts in wood.  I think the outcome is good, the client is happy, and my conscience is quiet.

Categories: Dorchester, trade secrets

Tagged: casting, conscience, curved work, Hobbs, Molding, Reynolds Advanced Materials

2 Comments

Annals of Forensic Carpentry, Vol.2 No.2: Why the stripes?

Posted on 20 August 2013

In the good old days, when fuel was cheap and carpenters were simple, no one cared a whit about insulation and — God forbid! — energy performance.  But now that we’re out of Eden, we need to concern ourselves with more than roof framing and perfectly coped crown.  Thermal performance, rain screens, and indoor air quality are now firmly in the carpenter’s bailiwick, but can be much more abstract than a tight-fitting miter joint.  That’s why I’m always looking for instances where building science reveals itself in glorious, explicit detail.


On a recent morning, I noticed this stripey pattern in the dew on my roof.

Pitched asphalt shingle roof with stripes showing thermal bridging


(Ignore the leaning chimney — it’s an experiment in non-Euclidean masonry)  Years ago I might have though, “What have those damn teenagers been up to overnight!” but now I just smiled.  The underside of my roof is insulated with closed-cell foam, but it was only applied in the rafter bays.

Closed-cell foam in between rafters


The foam insulation between the rafters has an R-value of about 26, while the pine rafters themselves only have an R-value of about 5.  This difference leads to much more heat loss (or gain in the summer if you have air conditioning) at each framing member than in the bulk wall cavity.  Dew had settled on my roof over a cool night recently, and in between the rafters, the insulation below allowed it to remain until the sun rose.   The concentrated heat loss at each rafter, however, was causing the dew to evaporate:  thermal bridging made visible!


Seemingly an esoteric detail, thermal bridging becomes an important practical concern if you’re trying to build a really efficient building.  If “details” like thermal bridging and air sealing are carefully addressed, it’s possible to build a house that needs little or no added heat in the winter.  More on this in the future.


Categories: Annals of Forensic Carpentry, Building science, Seen

Tagged: building science, closed-cell foam, insulation, roof, Thermal bridging

0 Comments

3-D printers?

Posted on 14 August 2013

I believe it’s rare for tradespeople to think of themselves explicitly as business owners, and I’m not an exception.  We see ourselves as makers of things, and we grudgingly accept the business side as the necessity that allows us to keep making.  For example, in the past when people asked me about my business model, I used to fumble for a coherent answer.


I’ve gradually come to realize that I do have a business model, though it’s been implicit for much of my company’s existence:  We can succeed if we provide products and services that can’t be replicated in a factory.  We’re based in Boston, where wages and expenses are very high, and we rarely make the same thing twice.  This is not a classic recipe for efficient production; a manufacturer with high volume and low overhead should beat us every time.  But we gravitate, by predisposition and necessity, toward the local and particular.  Replicating one-off architectural details and building cabinets for funny-shaped spaces are precisely the tasks that flip the playing field, and our location and production scale become assets.


We just finished making a batch of brackets, just the sort of project that I imagine would be perfect for us.  The client brought us weathered examples of two different brackets from a house he’s restoring and asked us to make a five of one and ten of the other.

Original and reproduction wood brackets Original and reproduction decorative wood brackets


We thrive on this work:  quirky details, impossible to find at Home Depot.  I even catch myself talking in lofty terms about preserving the “biodiversity” of the architectural ecosystem.  But as I was driving to deliver the brackets, my pessimistic angel started whispering in my ear.  “How long until 3D printers make small woodshops obsolete for this sort of fabrication?”  Subsequently I’ve been taking bets from colleagues about when the pricing curves will intersect.  Two years?  A decade?  I imagine the technology may soon make it more affordable for people to restore their houses, a good thing for sure, but I’ll be sad if the analog skills to make such things disappear.


Addendum

This job came to us from the owner of a favorite hardware store in Jamaica Plain.  He handed me a brown paper bag with the two brackets and asked me to price the reproductions.  The transaction had a whiff of the illicit, though perhaps only in my overactive imagination.


I didn’t know anything about the house the brackets came from, so, again with the imagination, I made up a story — western suburb, manicured lawn, careful restoration.  When I delivered the goods today, I asked my client where they were going.  Turns out I’ve been staring at the house for weeks, as it’s directly across the street from one of our big ongoing projects.

Old victorian house in need of repair


It was very gratifying to see the brackets in situ, though I was a bit embarrassed at not having noticed the resemblance.


Detail of brackets on old Victorian house in need of repair Detail of ornate brackets on old Victorian house, in need of repair


The house has been a regular source of speculation and fantasy as we’ve worked across the street.  There’s a syndrome common to historically-minded carpenters and those who volunteer at animal shelters, and I was relieved to know that this house wouldn’t need adoption — someone was starting to make it whole again.

Categories: Shop work, Uncategorized, victorian, vintage

Tagged: bracket, corbel, Jamaica Plain, mahogany, sapele, shop work, victorian

0 Comments

« Older entries    Newer entries »

Trimitsis Woodworking

  • Please visit us

Categories

  • Annals of Forensic Carpentry
  • Architectural photography
  • Before and after
  • Building science
  • Details
  • Dorchester
  • entomology
  • Found
  • History
  • Seen
  • Shop work
  • Structural work
  • trade secrets
  • Uncategorized
  • victorian
  • vintage

Return to top

© Copyright 2014